Decision Matrix
Choose the right lane
Use this as a quick navigation board: scan each fight or build decision, then jump to the full breakdown and source frames below.
What Heat is for
Heat is both challenge and economy. Each weapon can claim new bounties at higher Heat, so the system encourages variety without forcing every weapon to play the same. The smartest early plan is to raise Heat only as fast as your clears remain stable.
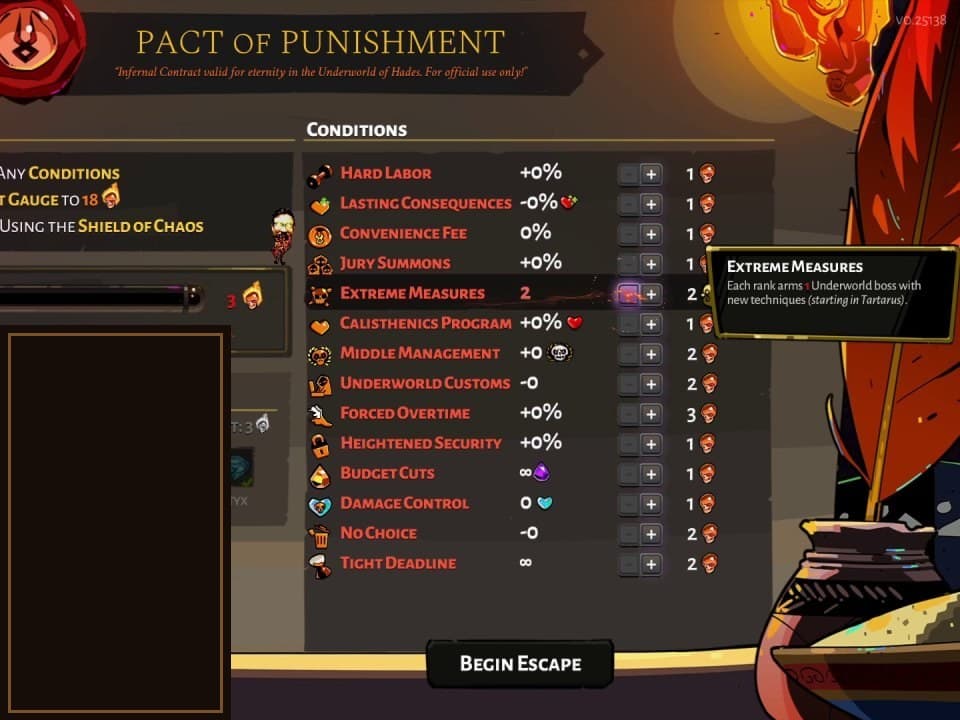
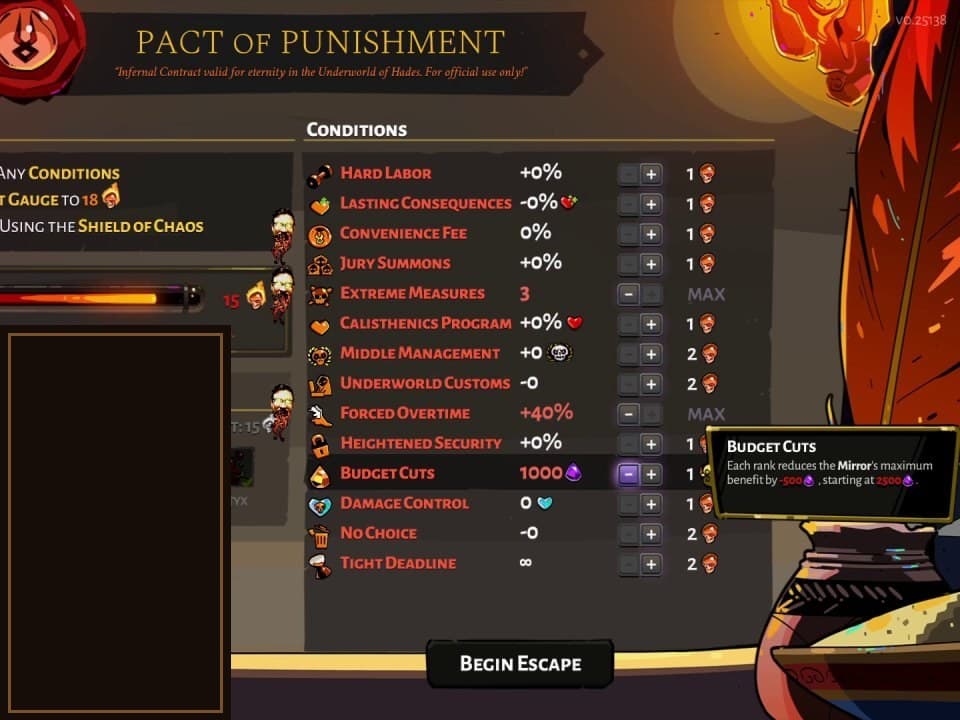
Condition selection
The best Pact conditions are the ones that tax a strength you can spare. If your build has huge damage, enemies with more health may be acceptable. If your movement is excellent, trap or speed pressure may be manageable. Avoid stacking conditions that attack the same weakness.
8, 16, and 32 Heat mindset
8 Heat is about learning which conditions feel fair. 16 Heat asks for a planned setup. 32 Heat requires refusing ego picks: take conditions your weapon and build can actually clear, then play slower than your damage output might suggest.
Raise Heat by preserving your clear identity
The cleanest Pact progression keeps the run recognizable. If a weapon wins by ranged control, do not add conditions that force frantic close-range trades. If a build wins by burst windows, avoid penalties that make every boss phase last long enough to expose weak defense. Add Heat in a way that taxes your spare capacity, not the thing the build depends on to function.
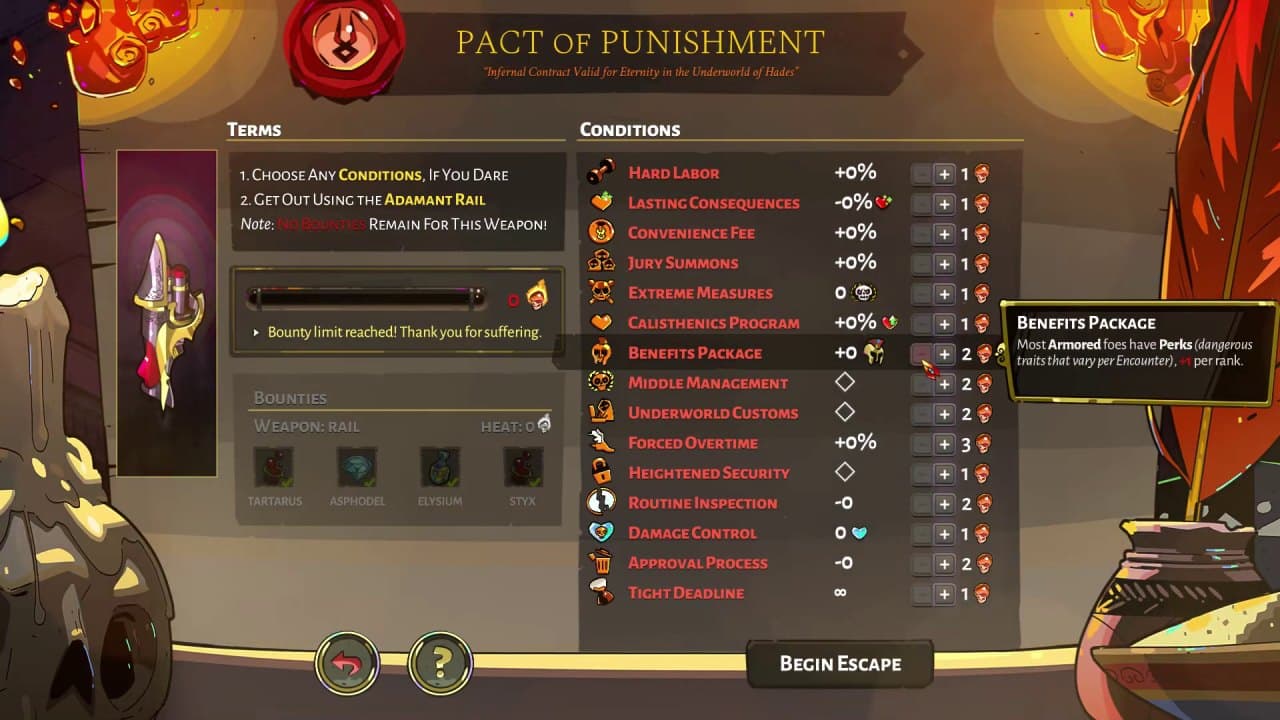
Bounty routing without overreaching
Because bounty rewards are tracked by weapon and Heat threshold, you do not need to force one favorite weapon into every hard modifier immediately. Rotate weapons through manageable Heat levels, collect the next reward, then return to harder settings once Mirror upgrades, keepsake routing, and aspect investment catch up. This keeps rare currency income moving without turning every run into a wall.
Quick Verdict
The Pact of Punishment is Hades’ post-clear difficulty and bounty system. Good Heat progression is not about turning on everything that looks small. It is about choosing penalties your build can absorb while still preserving boss consistency.
Raise Heat gradually per weapon to collect bounties without breaking consistency.
Prefer predictable penalties over modifiers that make boss patterns unreadable.
For higher Heat, build around safety and reliable damage before speed.
Pre-Run Checklist
How to test Pact of Punishment and Heat Guide in the next run
Higher Heat is won by compatibility between weapon, build, and penalties.
Plan
Compress Pact of Punishment and Heat Guide into one next-run plan
Raise Heat gradually per weapon to collect bounties without breaking consistency.
Check
What Heat is for
Test
Change one variable so the test means something
Raise Heat gradually per weapon to collect bounties without breaking consistency.
Check
Next read: Hades
Review
After failure, identify the most expensive mistake
Choosing many low-value penalties that all make boss fights worse.
Check
Next read: Best Hades Weapon Aspects for Consistent Clears
Player Intent Router
Choose the section that matches your current wall
High-retention guide pages do not force every player to read linearly. They help the player name the problem, act on it, then continue into the next useful page.
01 · Fast route
You want to turn Pact of Punishment and Heat Guide into the next run plan
The first job of a guide page is reducing hesitation. Take one route you can execute instead of trying to memorize the whole database.
Page action
Raise Heat gradually per weapon to collect bounties without breaking consistency.
02 · Decision point
You are choosing between several good-looking options
Choose the option that solves the current wall. Rarity, tier-list strength, and flashy clips should come after the run problem.
Page action
Raise Heat gradually per weapon to collect bounties without breaking consistency.
03 · Review loop
You tried it, but results are still inconsistent
Change only one variable in review: opener, main button, keepsake, boss plan, or resource order.
Page action
Choosing many low-value penalties that all make boss fights worse.
Field Guide
How to use this page
Pact of Punishment and Heat Guide should not be treated as a trivia entry. Use it as a route decision before the next run: identify the current wall, then choose the lowest-execution answer that solves that wall.
If the problem is survival, prioritize safer spacing, keepsakes, Mirror choices, or weapon rhythm. If the problem is damage, identify which button carries the build. If the problem is resources, spend on upgrades that improve several future runs instead of only the current attempt.
Screenshots and video references are support material: they help you read tells, spacing, reward locations, or build direction. The written conclusions are the part to carry into the run.
Before entry
Use this Guide page to name the real job first: survival, damage, resources, or route clarity. A specific job keeps the run from being pulled off course by rarity, flashy clips, or tempting side rewards.
During the fight
Compress the advice into one action rule: wait for the tell, preserve spacing, clear adds first, take the core boon, or leave before greed damage begins. Good guidance should survive a messy screen.
After failure
Do not only ask whether the damage was high enough. Ask where health started disappearing, which reward did not serve the route, and whether the next run needs a different keepsake, Mirror setup, aspect, or starting god.
After reading Pact of Punishment and Heat Guide, do not jump straight to an unrelated entry. Test the advice in one run by changing a single variable: starting keepsake, primary damage button, boss phase plan, resource spending order, or the positioning shown in the reference frames. That makes the next review cleaner because you can tell which change actually improved the route.
If you only remember one rule: Pact of Punishment and Heat Guide is useful because it reduces hesitation in the next run. Anything that helps you decide when to attack, retreat, reroute, or preserve resources is what actually improves clear consistency.
A database page works best when it turns small decisions into a stable route. Read this page, follow the related entries, then test the idea in one escape attempt so the guide becomes practice rather than trivia.
Takeaways
- 01
Raise Heat gradually per weapon to collect bounties without breaking consistency.
- 02
Prefer predictable penalties over modifiers that make boss patterns unreadable.
- 03
For higher Heat, build around safety and reliable damage before speed.
Strategy Path
What to read next
Do not leave Pact of Punishment and Heat Guide as an isolated note. Follow the route below to turn one useful answer into a complete escape plan.
01 · Solve the wall
Hades
After Pact of Punishment and Heat Guide, use Hades to check the next decision layer: Stay outside spin range, clear skull casts before they detonate, and never spend all dashes entering melee. Phase two is won by patience, not by racing the health bar.
02 · Solve the wall
Charon
After Pact of Punishment and Heat Guide, use Charon to check the next decision layer: Only trigger Charon when your build is already stable. Keep distance, respect sweeping oar attacks and waves, and treat the reward as a bonus rather than a required first-clear step.
03 · Build the route
Best Hades Weapon Aspects for Consistent Clears
After Pact of Punishment and Heat Guide, use Best Hades Weapon Aspects for Consistent Clears to check the next decision layer: The best aspect is the one that gives your run a clear job. Achilles Spear supports Cast burst, Chiron Bow focuses Special damage, Beowulf Shield rewards loaded burst, Arthur Blade gives safety, and Hestia Rail creates disciplined reload shots.
04 · Build the route
Mirror of Night Upgrade Guide
After Pact of Punishment and Heat Guide, use Mirror of Night Upgrade Guide to check the next decision layer: Mirror upgrades are the foundation of consistent Hades clears. Early Darkness should buy forgiveness first: extra lives, extra dashes, health, and reliable damage. Alternate talents become powerful later, once you understand what your build is trying to control.
Change one variable at a time along this path: setup first, boon route second, boss phase handling last. That makes it easier to tell which adjustment actually improved consistency.
Run Study Board
Turn the guide into one playable review loop
This page compresses 2 source references and gameplay frames into three steps: watch, apply, and review.
01 · WatchRead the danger in the frame first
Heat is both challenge and economy. Each weapon can claim new bounties at higher Heat, so the system encourages variety without forcing every weapon to play the same. The smartest early plan is to raise Heat only as fast as your clears remain stable.
Frame action
Treat the Pact as a menu of tradeoffs, not a checklist of bragging rights.
02 · ApplyTurn the advice into one next-run change
Raise Heat gradually per weapon to collect bounties without breaking consistency.
Frame action
Raise Heat gradually per weapon to collect bounties without breaking consistency.
03 · ReviewReview the most expensive repeated mistake
Choosing many low-value penalties that all make boss fights worse.
Frame action
Pick penalties that your weapon can absorb while keeping its clear pattern intact.
Tactical Drill Table
Convert Pact of Punishment and Heat Guide into four playable checks
This is not an encyclopedia summary. It is a next-run drill card: what to look for, what to do, what to avoid, and which page should fill the next gap.
01 · Observe
Turn Pact of Punishment and Heat Guide into one question
If you see
You read several tips but still do not know what the next run should test.
Do this
Raise Heat gradually per weapon to collect bounties without breaking consistency.
02 · Commit
Test only one variable
If you see
Heat is both challenge and economy. Each weapon can claim new bounties at higher Heat, so the system encourages variety without forcing every weapon to play the same. The smartest early plan is to raise Heat only as fast as your clears remain stable.
Do this
Raise Heat gradually per weapon to collect bounties without breaking consistency.
03 · Avoid
After failure, record the costliest mistake
If you see
The result is inconsistent, but the failure point is still vague.
Do this
Prefer predictable penalties over modifiers that make boss patterns unreadable.
Do not
Do not interpret one failed attempt as proof the whole route is wrong.
Next: Best Hades Weapon Aspects for Consistent Clears04 · Pivot
Use the next page to fill the route gap
If you see
This guide solved one layer, but weapon, boon, boss, or resource gaps remain.
Do this
For higher Heat, build around safety and reliable damage before speed.
Build Synergy Board
Connect this page to a full route
Readers often leave when the page does not answer what to pair next. This board connects the advice to gods, keepsakes, weapons, resources, and the next guide.
Starter plan
Turn Pact of Punishment and Heat Guide into the next route
Pair with
Hades
A guide page is useful when it removes one decision from the next run instead of asking the player to memorize everything.
Page check
Raise Heat gradually per weapon to collect bounties without breaking consistency.
Build lock
Lock only one build direction at a time
Pair with
Charon
Specific routes create useful review. Change one build variable at a time so the result actually teaches you something.
Page check
Raise Heat gradually per weapon to collect bounties without breaking consistency.
Next gap
Use the next page to fill the missing layer
Pair with
Best Hades Weapon Aspects for Consistent Clears
After this page solves one problem, the best next click should target the remaining gap instead of sending the reader back to search.
Page check
Choosing many low-value penalties that all make boss fights worse.
Progression Checklist
Turn the stuck objective into the next run
Progression pages lose readers when they tell them to repeat the same action. This checklist keeps prerequisites, the next test, stuck-state debugging, and the review signal in one place so the reader knows whether to continue, reroute, or unlock something first.
Pact overview
| Phase | Check first | Next action | Stuck signal |
|---|---|---|---|
| Unlock gate | Start Pact routing only after the weapon has a reliable clear plan; Heat is a bounty system, not a panic button. | Confirm the prerequisite before spending another full run on the same assumption. | The system, objective, or encounter still does not appear after the expected trigger. |
| Next run test | Add predictable penalties first, then review whether the same boss or biome starts breaking the route. | Change one variable and write the result as unlocked, improved, worse, or still blocked. | Multiple changes make it impossible to know which choice helped or hurt the route. |
| Stuck check | If the run collapses, remove stacked penalties that attack the same weakness: speed, boss readability, healing, or room density. | Switch from repeating the objective to checking the missing gate that controls it. | You repeat the same room, gift, Heat level, or tunnel route without a new signal. |
| Review signal | A good Heat setup still reaches the final boss with a recognizable damage plan and enough defensive margin. | Use the signal to choose the next guide instead of restarting search from scratch. | The result tells you nothing about the next run, which means the test was too broad. |
Route Data Table
Convert Pact of Punishment and Heat Guide into the next run
Broad guides need an execution order. This table compresses the route step, decision, evidence, and review signal into three rows so the reader leaves with a plan.
Table use
Take one row into the next attempt; return for the next row after the run.
| Route step | Decision | Evidence | Review signal |
|---|---|---|---|
| Plan the run | Raise Heat gradually per weapon to collect bounties without breaking consistency. | Heat is both challenge and economy. Each weapon can claim new bounties at higher Heat, so the system encourages variety without forcing every weapon to play the same. The smartest early plan is to raise Heat only as fast as your clears remain stable. | Choosing many low-value penalties that all make boss fights worse. |
| Lock the build | Raise Heat gradually per weapon to collect bounties without breaking consistency. | The best Pact conditions are the ones that tax a strength you can spare. If your build has huge damage, enemies with more health may be acceptable. If your movement is excellent, trap or speed pressure may be manageable. Avoid stacking conditions that attack the same weakness. | Raising Heat before the weapon has a reliable clear route. |
| Review the gap | For higher Heat, build around safety and reliable damage before speed. | Hades | Do not keep forcing the same problem without a review signal. |
People Also Ask
Pact of Punishment and Heat Guide FAQ
These answers are for search visitors and stuck players: resolve the most common decisions first, then continue into the deeper breakdown.
Q1How should I use this Pact of Punishment and Heat Guide?
+
The Pact of Punishment is Hades’ post-clear difficulty and bounty system. Good Heat progression is not about turning on everything that looks small. It is about choosing penalties your build can absorb while still preserving boss consistency. Do not try to memorize the entire guide at once. Take one route question into the next run.
Q2What player problem does Pact of Punishment and Heat Guide solve first?
+
Raise Heat gradually per weapon to collect bounties without breaking consistency. Solve the problem that kills the next run before optimizing smaller build gains.
Q3What should I read after Pact of Punishment and Heat Guide?
+
The best Pact conditions are the ones that tax a strength you can spare. If your build has huge damage, enemies with more health may be acceptable. If your movement is excellent, trap or speed pressure may be manageable. Avoid stacking conditions that attack the same weakness. If the failure point remains, move to the related boss, weapon, keepsake, or resource page that answers the next layer.
Q4What should I avoid when applying Pact of Punishment and Heat Guide?
+
Choosing many low-value penalties that all make boss fights worse. Raising Heat before the weapon has a reliable clear route.
Best Picks Breakdown
Actionable notes by section
Entry 1
What Heat is for
Heat is both challenge and economy. Each weapon can claim new bounties at higher Heat, so the system encourages variety without forcing every weapon to play the same. The smartest early plan is to raise Heat only as fast as your clears remain stable.
Visual Note
Pact overview
Treat the Pact as a menu of tradeoffs, not a checklist of bragging rights.
Entry 2
Condition selection
The best Pact conditions are the ones that tax a strength you can spare. If your build has huge damage, enemies with more health may be acceptable. If your movement is excellent, trap or speed pressure may be manageable. Avoid stacking conditions that attack the same weakness.
Visual Note
High-heat setup
Higher Heat is won by compatibility between weapon, build, and penalties.
Entry 3
8, 16, and 32 Heat mindset
8 Heat is about learning which conditions feel fair. 16 Heat asks for a planned setup. 32 Heat requires refusing ego picks: take conditions your weapon and build can actually clear, then play slower than your damage output might suggest.
Visual Note
Pact menu pressure
Pick penalties that your weapon can absorb while keeping its clear pattern intact.
Entry 4
Raise Heat by preserving your clear identity
The cleanest Pact progression keeps the run recognizable. If a weapon wins by ranged control, do not add conditions that force frantic close-range trades. If a build wins by burst windows, avoid penalties that make every boss phase last long enough to expose weak defense. Add Heat in a way that taxes your spare capacity, not the thing the build depends on to function.
- Add one new pressure type at a time so failures are readable.
- Keep boss consistency higher priority than room-clear speed.
- Treat every successful Heat clear as a template for that weapon.
Visual Note
High Heat planning
A 32 Heat route is built from compatible compromises, not every scary toggle.
Entry 5
Bounty routing without overreaching
Because bounty rewards are tracked by weapon and Heat threshold, you do not need to force one favorite weapon into every hard modifier immediately. Rotate weapons through manageable Heat levels, collect the next reward, then return to harder settings once Mirror upgrades, keepsake routing, and aspect investment catch up. This keeps rare currency income moving without turning every run into a wall.
Visual Note
Pact overview
Treat the Pact as a menu of tradeoffs, not a checklist of bragging rights.